Welcome to the ultimate guide on mastering winged eyeliner! Whether you’re a makeup novice or a beauty enthusiast, achieving the perfect winged eyeliner can elevate your makeup game to new heights. In this comprehensive article, we’ll walk you through 8 easy steps to help you master the art of winged eyeliner like a pro.
From selecting the right products to mastering the flick, we’ve got you covered with expert tips and techniques. Say goodbye to uneven lines and smudges, and hello to flawless winged looks that will turn heads wherever you go. Get ready to unleash your inner makeup artist and take your eye makeup to the next level!
Steps to Mastering Winged Eyeliner
1. Gather your supplies
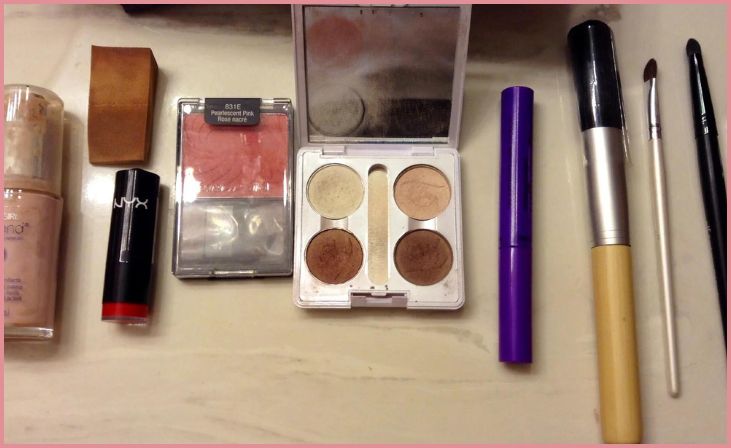
To begin your journey towards mastering winged eyeliner, ensure you have all the necessary tools at your disposal. Your primary item will be eyeliner, which comes in various forms such as gel, liquid, or pencil. Gel and liquid eyeliners often provide more precision, while pencils offer ease of use, making them suitable for beginners.
Additionally, if you opt for gel eyeliner, an angled eyeliner brush will be indispensable for achieving clean lines and precise flicks. Don’t forget to have makeup remover and cotton swabs on hand to rectify any errors or smudges during the application process. By gathering all your supplies before starting, you’ll streamline the process and minimize interruptions, allowing you to focus solely on honing your winged eyeliner technique with confidence.
2. Prep your eyelids
Before diving into the intricate art of winged eyeliner, it’s essential to prepare your eyelids adequately. Begin by applying an eyelid primer or concealer evenly across your lids. This step serves multiple purposes: it creates a smooth and uniform base for your eyeliner application, helps the product adhere better, and prevents creasing or smudging throughout the day.
By priming your eyelids, you ensure that your winged eyeliner stays sharp and precise, without any unsightly streaks or fading. Take your time during this step to blend the primer or concealer seamlessly, ensuring a flawless canvas for your winged eyeliner masterpiece. With well-prepped eyelids, you set the stage for a stunning and long-lasting winged eyeliner look that commands attention.
Also Read : 8 Essential Oils for Aromatherapy Massage
3. Start by drawing a thin line
With your supplies gathered and eyelids prepped, it’s time to embark on the actual application of winged eyeliner. Begin by drawing a thin line along your upper lash line, starting from the inner corner of your eye and gradually working your way outward. This initial line serves as the foundation for your winged eyeliner look, providing a base upon which to build the wing.
Use short, light strokes to ensure smooth and even application, adjusting the pressure as needed to control the thickness of the line. Take your time during this step to achieve precision and accuracy, as a well-defined base sets the stage for a flawless winged eyeliner flick.
4. Decide on the angle and length
Before proceeding further, take a moment to determine the angle and length of your winged eyeliner. Visualize the desired shape and size of the wing, considering factors such as your eye shape and personal preference. Once you’ve decided on the angle and length, use your eyeliner or a small pencil to mark the endpoint of the wing with a tiny dot.
This dot serves as a guide for creating a symmetrical and proportionate wing on both eyes, ensuring a balanced and cohesive look. Take your time to adjust the placement of the dot until you’re satisfied with the positioning, as it will dictate the overall appearance of your winged eyeliner.
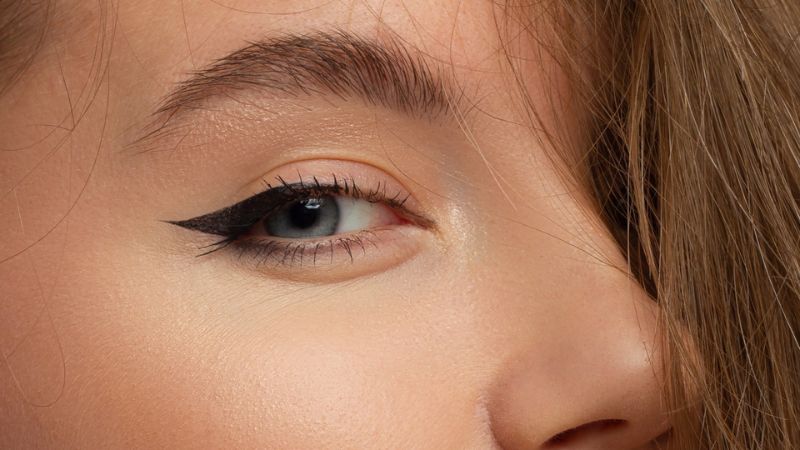
5. Connect the dot to the outer corner
With the endpoint of your wing marked, it’s time to connect it to the outer corner of your eye to create the wing shape. Using your eyeliner, draw a line from the dot towards the outer corner of your eye, following the natural curvature of your lash line. This line should extend outward at an angle, gradually tapering off to create a delicate flick.
Take care to maintain a steady hand and consistent pressure to achieve a smooth and fluid line, ensuring a seamless transition from the base of the lash line to the wing tip. Aim for symmetry and balance between both eyes, adjusting the angle and length of the wing as needed to achieve harmony.
6. Fill in the triangle
With the outline of your winged eyeliner in place, it’s time to fill in the triangle you’ve created. Using your eyeliner, carefully fill in the space between the upper lash line and the wing, gradually thickening the line as you go. Start from the outer corner of your eye and work your way inward, ensuring smooth and even application throughout.
Take your time to build up the intensity of the line to your desired thickness, adjusting the pressure as needed to control the opacity of the eyeliner. Pay close attention to any gaps or uneven areas, filling them in to achieve a seamless and polished look. The goal is to create a crisp and defined wing that complements your eye shape and enhances your overall makeup look.
Also Read : 8 Must-Have Brushes for Seamless Makeup Application
7. Clean up any mistakes
Even the most skilled makeup artists encounter minor mistakes or imperfections during the winged eyeliner application process. Fortunately, these errors can be easily corrected with a bit of precision and patience. Dip a cotton swab into makeup remover and carefully trace along the edges of your winged eyeliner, smoothing out any uneven lines or smudges.
Take care not to remove too much product or disrupt the shape of the wing, as this can alter the overall appearance of your makeup look. Use gentle, precise motions to refine the edges and achieve a flawless finish. Remember, practice makes perfect, so don’t be discouraged by minor mistakes—simply take your time to correct them and continue refining your technique.
8. Finish with mascara
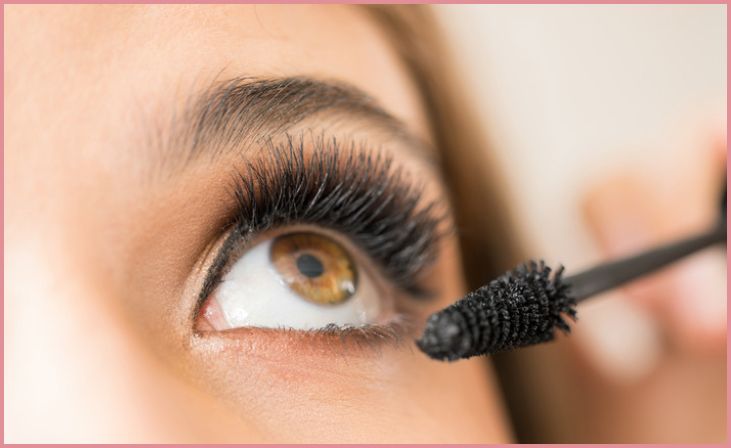
To complete your winged eyeliner look, apply a coat of mascara to your upper lashes. Mascara adds volume, length, and definition to your lashes, enhancing the overall impact of your eye makeup look. Start at the base of your lashes and wiggle the mascara wand upwards to ensure even coverage and maximum lift. Focus on coating the outer lashes to further accentuate the winged eyeliner effect and create a dramatic, fluttery look.
Take care to separate any clumps and ensure each lash is evenly coated for a polished finish. With mascara applied, your winged eyeliner look is complete, leaving you with bold, beautiful eyes that are sure to turn heads wherever you go.
Conclusion
In conclusion, mastering winged eyeliner is a skill that can transform your makeup routine and boost your confidence. While it may seem intimidating at first, with dedication and practice, you can achieve flawless winged looks every time. Remember to be patient with yourself and experiment with different techniques to find what works best for you.
Whether you prefer a bold, dramatic wing or a subtle, everyday look, the key is to have fun and express your creativity. So, grab your eyeliner brush, follow the 8 easy steps outlined in this guide, and get ready to rock those wings like never before. With persistence and perseverance, you’ll soon be a winged eyeliner pro, turning heads with your impeccable makeup skills wherever you go!
Frequently Asked Questions
How do I prevent smudging throughout the day?
To prevent smudging, set your eyeliner with a matching eyeshadow or translucent powder. This helps absorb excess oil and keeps your eyeliner in place for longer hours without smudging.
Can I achieve a winged eyeliner look with pencil eyeliner?
Yes, you can achieve a winged eyeliner look with pencil eyeliner by sharpening it to a fine point and using short, precise strokes. Start by drawing a thin line along your upper lash line and gradually extend it outward to create the wing.
How do I fix mistakes without ruining my makeup?
If you make a mistake while applying winged eyeliner, don’t worry! Dip a small angled brush in makeup remover and carefully erase any mistakes without disturbing the rest of your makeup. Then, touch up the area with a bit of concealer to ensure a seamless finish.